****Warning: Picture heavy post!****
I'm finally ready to finish the magic loop tutorial....the heel! In the next month or so I will post how to do magic loop two at a time.
1. Part 1 of the tutorial can be found here! Also there have been some requests for a video (and blogger wouldn't let me email those commenters), so here are some video links for getting started!
(if you have others that you love, please leave a link in the comments!)
2. So you are ready to turn the heel on your sock.
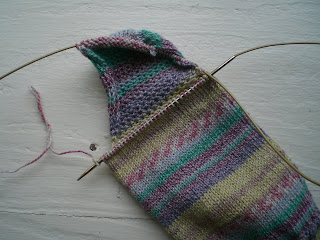
Knit the heel flap back and forth turning your work as needed, leaving half the stitch on the cord unworked.
Another view of heel flap.
3. Turn the heel, working short rows (any heel method would work and could be adapted, I'm just showing you my favorite)
4. Now you are ready to pick up the stitches along the heel flap. First move the heel stitches back on the cord, so you are able to use the needle comfortably.
(In the end, we will have all the heel stitches on one needle and the top of the foot stitches on the other) Pull the needle so there is no "loop" between the picked up stitches and the bottom of the heel stitches.
6. Now we need to pick up stitches on the other side of the heel flap. Move the top of the foot stitches down onto the cord so you can use the needle to pick up the stitches.
7. After picking up the desired stitches, keep knitting all the "heel" stitches. The "loops" should be positioned on either side of the top of the foot.
8. Work your gusset decreases as normal. I know right now there are a lot of stitches on one needle, but quickly they will decrease.
Now you should be good to finish your sock. Good Luck!! and as always ask me questions if something is unclear!


I think I might need you to come teach me in person.... ;-) I love that yarn BTW.
ReplyDeletegreat tutorial. Just like I do it. I like the striping action on the heel.
ReplyDeleteThat's great! I can't wait for the two at once tutorial...although I think it will be awhile before I try that :-)
ReplyDeleteWell written and photographed tutorial ~ it makes perfect sense! (But I'm still wondering if you still prefer the dpn's?)
ReplyDeleteLeah--I'm so impressed with your tutorial and I wish I had you in Virginia to help me learn it. I am deinitely bookmarking these posts on it, and when TURTLE is done (and thanks for saying I had patience, Honey!!), I can actually learn Magic Loop! I just ordered some sock yarn from an etsy shop called Happy Sheep Yarns--the owner's an internet bud I met at KnittingHelp and then joined her Rav group called OUR VIRTUAL KNITTING COMMUNE. She does some lovely stuff. I also have some wonderful yarn from Bea I need to make some socks with. SO, I'll be able to do those socks in Magic Loop--with your help from these posts!!
ReplyDeleteTHanks!
THANK YOU! for your tutorial. I think it was great! I'm working on my first sock! Thanks again.
ReplyDeleteI can't tell you how many times I come back to your tutorials, clear, easy to understand instructions and pictures!
ReplyDeleteThank you!
I have been working on sock one for a few weeks....again at the point where at the beginning of each row I sl 1 for 20 rows and use the sl to pick up the side .......and then had lots of holes.....
ReplyDeleteI have completed my heal turns and am ready to pick up my gusset. This seems to be my downfall. When my needles are in the home position, my turned heal is on the back needle and my instep is on the front needle. I have attempted to add the gusset twice and I end up with part of the gusset attached to the instep and not the heal. Can you help me?
ReplyDeleteHow would I do 2 at a time cuff down with heel flaps on one circular needle.
ReplyDeleteHi Thank you for this tutorial. I hope you keep it here. Its 'a life saver... :)
ReplyDelete