Showing posts with label magic loop. Show all posts

Friday, October 24, 2008

Magic Loop 2-at-a-time Tutorial Part 2--the heel

*** Warning: Picture Heavy post!!***

Here is part 1 of this tutorial!

1.  So at this point you should be ready to turn the heel on your socks.  I'll be showing how to do a heel flap 2 at a time.

2.  Work the heel flap back and forth on the right sock and turn the heel (yes it is important to start with the right one, not the left...I know from personal experience)  The other sock is just left on the cord for now.

3.  Move the heel flap stitches down on the cord freeing up the needle to pick up stitches.

4. Pick up the heel stitches on the left side of the heel flap.

5. Pull the cord through removing the loop (this is the same as one at a time ML knitting)

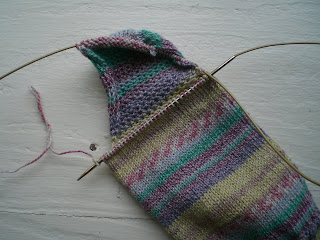
6.  Move the left sock down on the cord to sit for a while.  Repeat on the left sock (heel flap, turn heel, and pick up stitches on the left side of the flap)

7. Turn your work and work one row on the front stitches of both socks without picking up any more stitches.

8. Turn work and pick on the remaining stitches of the sock you are working with.

9.  Keep knitting the rest of the "heel" stitches, so now all the heel stitches are together on one side and the top of the foot stitches are on the other side (I know there are a lot of stitches on the heel side right now, but they will decrease quickly)

10.  Now pick up the remaining heel flap stitches on the other sock and keep knitting the rest of the heel stitches.


11. Congratulations!  You have turned both your heels and are ready to continue on to finish your socks.

Ask your questions, just make sure that I have a way of contacting you with the answer!

Thursday, October 23, 2008

Magic Loop 2-at-a-time Tutorial Part 1

***Warning: Picture heavy post!***

My goal in this tutorial is to show how to do two socks at a time using Magic Loop!  I assume that you are familiar with knitting socks and regular magic loop knitting (if not see my previous tutorials for some help).


1. To start with you you need one long circular needle (mine are a 60 inch Addi's....I wish it were a little bit shorter)  You also need your yarn separated into two balls (one for each sock)

2.  Cast on half your stitches for the first sock.  Slide them down the cord.

3. Then (using the other ball of yarn) cast on all your stitches for the 2nd sock.


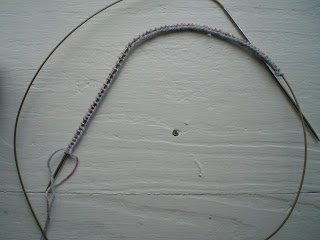
4.  Find the middle of your stitches on the second sock and pull the cord through to make your "loop."  (You have half of the first sock cast on and all of the second)

5.  Now you are ready to cast on the remaining stitches for the first sock.  Take the yarn and bring the needle close to where you left off to cast on the stitches across from the ones you already did.

(bring the yarn and needle into position to cast on other half)
(casting on other half)

6.  Now you are ready to join your first sock for knitting in the round.  This is just like normal magic loop knitting.
(bring the stitches to the ends of the needles, pull the back needle which has the working yarn on it out and around to knit the next stitch that should be knit)


7.  Then you need to join the second sock.  Adjust your needles so you have enough room to work and so that the stitches to be knit are on the needle.  Then join as usual and knit.

8. Now you should be ready to turn your work, adjust your needles and knit the other side.  Remember to switch balls of yarn as you switch socks.

You should be good to go until the heel now.  I would mark the spot where you have made a complete round (of both socks)  Normally I don't do this because it is obvious, but I get confused with 2  at a time if I don't)  I think this method is a little fiddly at first, but once you have an inch or so it settles down.  Questions? Please ask (make sure to leave a way for me to contact you with an answer)

Part 2-the heel-coming tomorrow!

Wednesday, October 15, 2008

Magic Loop Tutorial Part 2--the heel

****Warning: Picture heavy post!****

I'm finally ready to finish the magic loop tutorial....the heel!  In the next month or so I will post how to do magic loop two at a time.   

1.  Part 1 of the tutorial can be found here!  Also there have been some requests for a video (and blogger wouldn't let me email those commenters), so here are some video links for getting started!


(if you have others that you love, please leave a link in the comments!)

2.  So you are ready to turn the heel on your sock.

Knit the heel flap back and forth turning your work as needed, leaving half the stitch on the cord unworked.

Another view of heel flap.

3.  Turn the heel, working short rows (any heel method would work and could be adapted, I'm just showing you my favorite)

4.  Now you are ready to pick up the stitches along the heel flap.  First move the heel stitches back on the cord, so you are able to use the needle comfortably.

Use the same needle (the one closest to the heel stitches) to pick up the heel stitches.

(In the end, we will have all the heel stitches on one needle and the top of the foot stitches on the other)  Pull the needle so there is no "loop" between the picked up stitches and the bottom of the heel stitches. 

5.  Then work the stitches along the top of the foot.  (you will need to turn your work to do this)


6.  Now we need to pick up stitches on the other side of the heel flap.  Move the top of the foot stitches down onto the cord so you can use the needle to pick up the stitches.

7.  After picking up the desired stitches, keep knitting all the "heel" stitches.  The "loops" should be positioned on either side of the top of the foot. 

8.  Work your gusset decreases as normal.  I know right now there are a lot of stitches on one needle, but quickly they will decrease.

Now you should be good to finish your sock.  Good Luck!! and as always ask me questions if something is unclear!

Wednesday, September 17, 2008

Magic Loop Tutorial Part 1

***Warning: Picture heavy post!***

Many of you wanted more info about the Magic Loop method for knitting socks, and Magic Loop two at a time.  Before we tackle Magic Loop two at a time, let's make sure we are all familiar with magic loop.  You experts out there feel free to chime in!

Magic Loop Tutorial (Part 1)

***I'm assuming you are somewhat familiar with how to knit socks.  If you aren't and need more info let me know and I will be happy to direct you to some super websites for that info***

1.  First off you need the right tools.  For magic loop you need one long circular needle in the desired size.  

I'm not sure how long is ideal, mine here is 40 inches tip to tip.  Some use shorter others longer.  I find this size just right for me!  My needles are Addi Turbos (only brand I've used for this method)  Ideally you want needles that have a flexible cord because it will be bended and you want the joins (where the cord and needles meet) to be fairly smooth so your work won't snag.

2.  Now we are ready to get started!  Cast on your desired stitches onto the one needle.

3.  Divide the stitches in two equal amounts.  You are going to be pulling a loop of your cord out between the two halves.  Here is that in pictures:

Stick needle between the two halves (note: cast on stitches should be on the cord, not needle part of your circular needles for this step)

Pull the cord through the stitches

Keep going until you have a nice size loop.  As you can see my stitches get a little stretched in this process.  No worries!  When you start knitting make sure to give a little tug when you switch needles (just like with DPN to prevent ladders)

4.  Now we are ready to join so we can knit in the round.   Move your stitches to the needles part of your circular needle.  You will want to keep the wrong sides of your sock (purls) facing each other on the inside at all times!  Here my stitches are moved to the needles.

On the front needle are the stitches I want to knit next (the ones I first cast on)  Pull the back needle out moving the back stitches onto the cord, leaving the stitches on the front needle alone.

Pick up the back needle and begin knitting!  Knit all the front stitches in desired pattern.

5.  Now that you have joined your stitches in the round, you are ready to go.  After knitting the front stitches as shown

Turn your work making the back stitches the ones you just knit and the front stitches the ones you need to knit next.  Remember the wrong sides should be facing each other on the inside.

Move the front stitches to the end of the needle (I think of this as home position!)

Now pull the back needle out moving the back stitches to the cord.  You are ready to knit the front stitches!  

Continue until you are ready to do your heel flap (that is part 2)

Summary:  (after you have got started!)
1. Have your work in home position
2. Pull the back needle out 
3. Knit the fronts
4. Turn work
5. Move the front stitches to the needle (now you should be in home position ready to repeat)

Now, what questions do you have?  I'm sure others out there have them and are too shy to ask, so please don't hesitate!